How to create a paid Telegram channel, easily and quickly
Step-by-step guide to creating a paid Telegram channel or group: a bot that grants and removes access automatically, Stripe payments and a public storefront.
Imagine you have a Telegram group or channel you've poured time and effort into. You share valuable content and you've built an engaged community. Yet you keep asking yourself how to monetize that work. How can you earn from offering quality content?
Keeping track of who pays and who doesn't by hand can become overwhelming, especially once your subscriber count starts to grow. And building a website to handle payments and access isn't a realistic option for everyone. The problem is clear: you need an efficient way to turn your Telegram group or channel into a paid one, and you need it without the hassle.
The perfect way to manage your Telegram membership
Grouptizer is the most complete platform to make money with Telegram by creating paid groups and channels. With it you can:
- Forget about adding or removing users manually. The @grouptizer_bot bot automatically manages who joins and who leaves based on whether their subscription is valid.
- Connect your Stripe account and get paid easily. You set the price and currency you want, and the money lands directly on your own Stripe account. If you don't have an account yet, you can create one during the process.
- Generate Access Codes to sell or give away access on your own. They're ideal if you don't want to use Stripe yet.
- Skip building a website. Grouptizer gives you a customizable public storefront where your customers subscribe, check their subscription status, and cancel on their own.
- Start for free, with nothing to pay upfront.
Paid channel or paid group?
It depends on the relationship you want with your subscribers. In a channel only you post and everyone else reads; that's the usual format for signals, analysis or announcements. In a group everyone can write, so it fits when what you sell includes the conversation and direct access to you. You can also combine them: a channel for publishing with a linked discussion group for comments.
If what you want is a paid Telegram group, the steps are exactly the same as the ones below. The bot manages access the same way in both formats.
Let's walk through, step by step, how to create your paid Telegram group or channel with Grouptizer.
1. Create your Grouptizer account, it's free
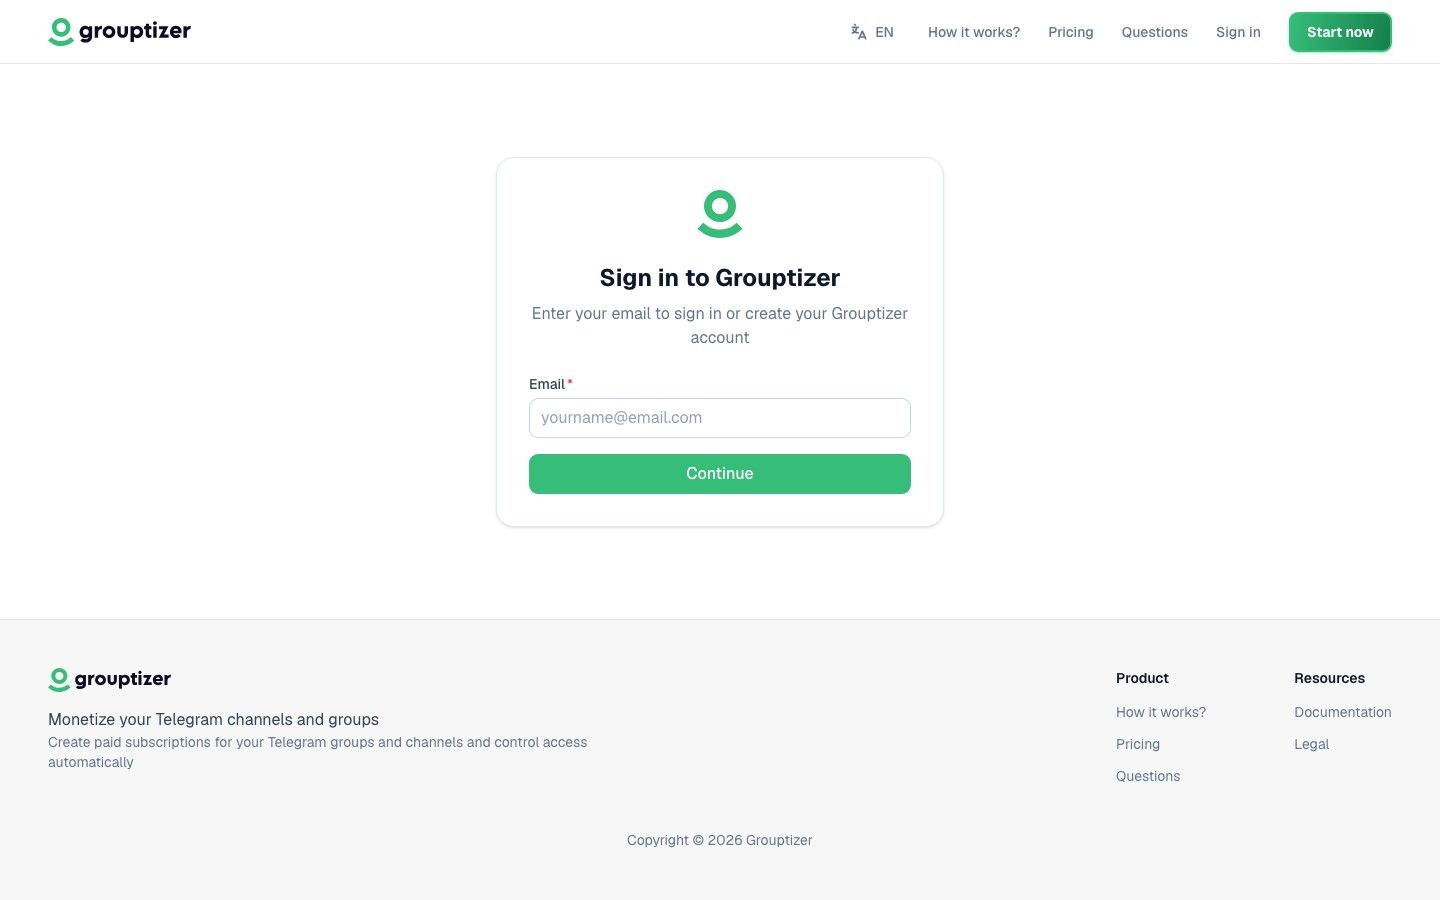
Go to grouptizer.com and create your account. All you need is your email: Grouptizer sends you a one-time code to confirm it, so there are no passwords to remember. You paste the code and you're in.
The best part of the Free Plan is that you start without paying anything upfront. There's just a 10% fee on what you earn through Stripe, so you only pay if you get paid. And if things go well, you can move up to a higher plan to lower that fee.
2. Create your store
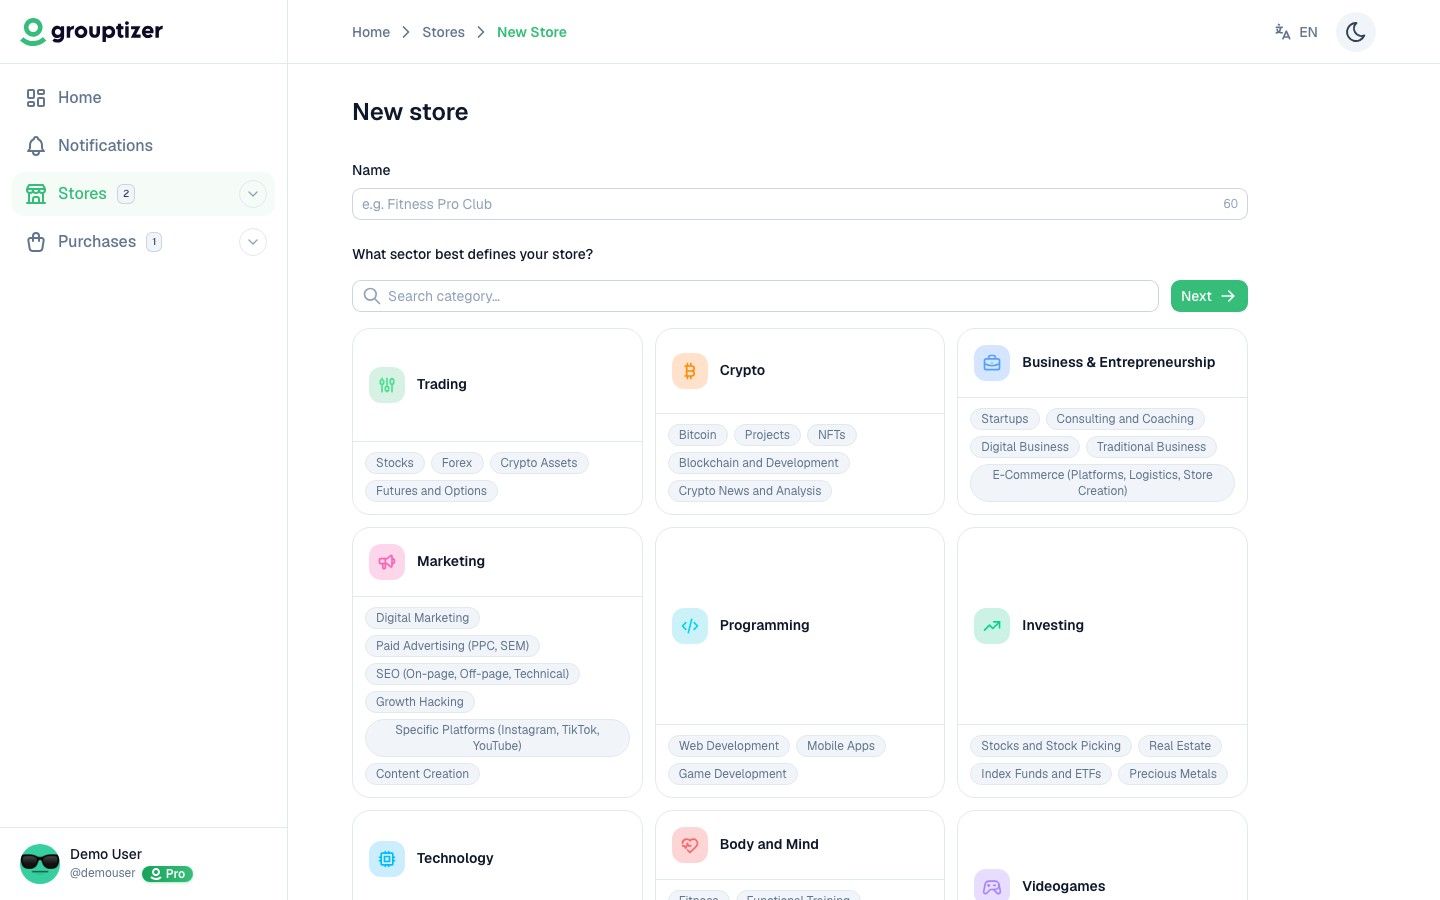
In Grouptizer, your store is the public page your customers land on. From your dashboard, open Stores and click New store. Give it a name, pick one or more categories, and choose whether to start from a prefilled template with sample content or from a blank store.
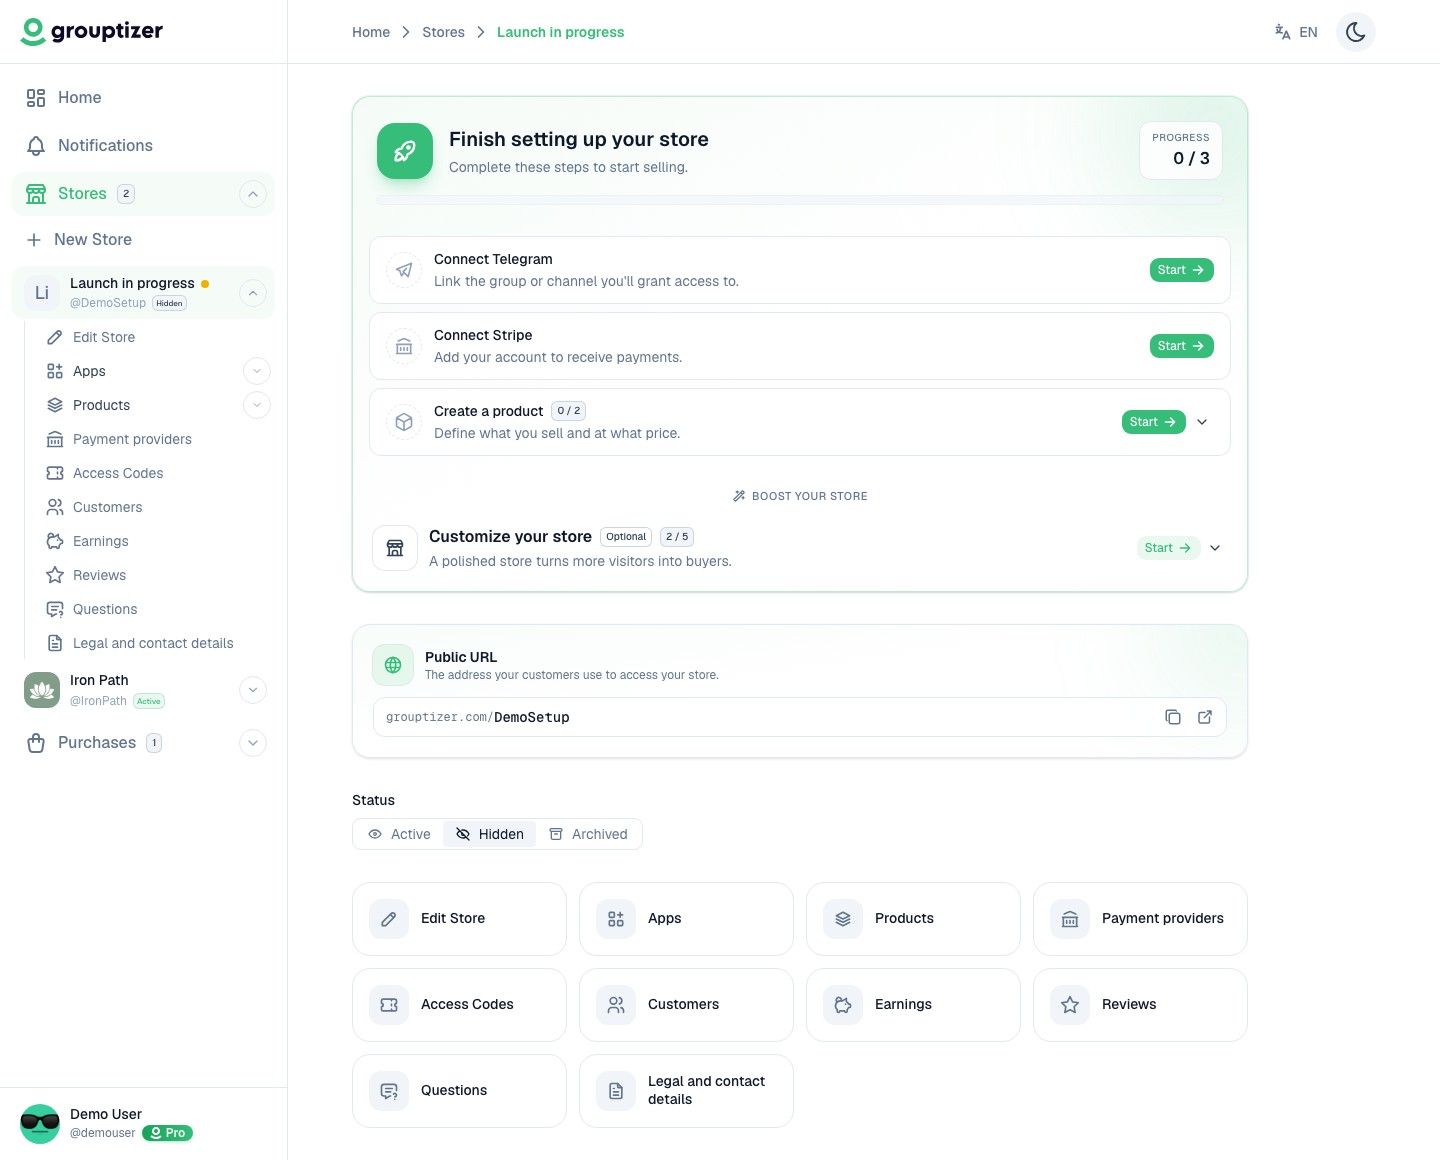
Once created, you land on your store overview, the panel where you manage everything. A checklist guides you through what's left before you can publish: connect Telegram, connect Stripe, and create a product.
3. Connect your Telegram channel or group
In your store, open Apps and create a new Telegram integration. Give it a clear name (for example, “VIP Channel”), since it also shows on your storefront. Then follow these steps:
- Open a chat with @grouptizer_bot on Telegram and tap “Start” so it can send you messages.
- Create a private group or channel (or use one you already have) and add @grouptizer_bot as an administrator.
- Give it admin permissions with these options ticked: Invite Users via Link, Ban Users, and Add New Admins. They're the same whether it's a group or a channel.
- Enter the verification code the bot sent you into Grouptizer. The code expires after 15 minutes.
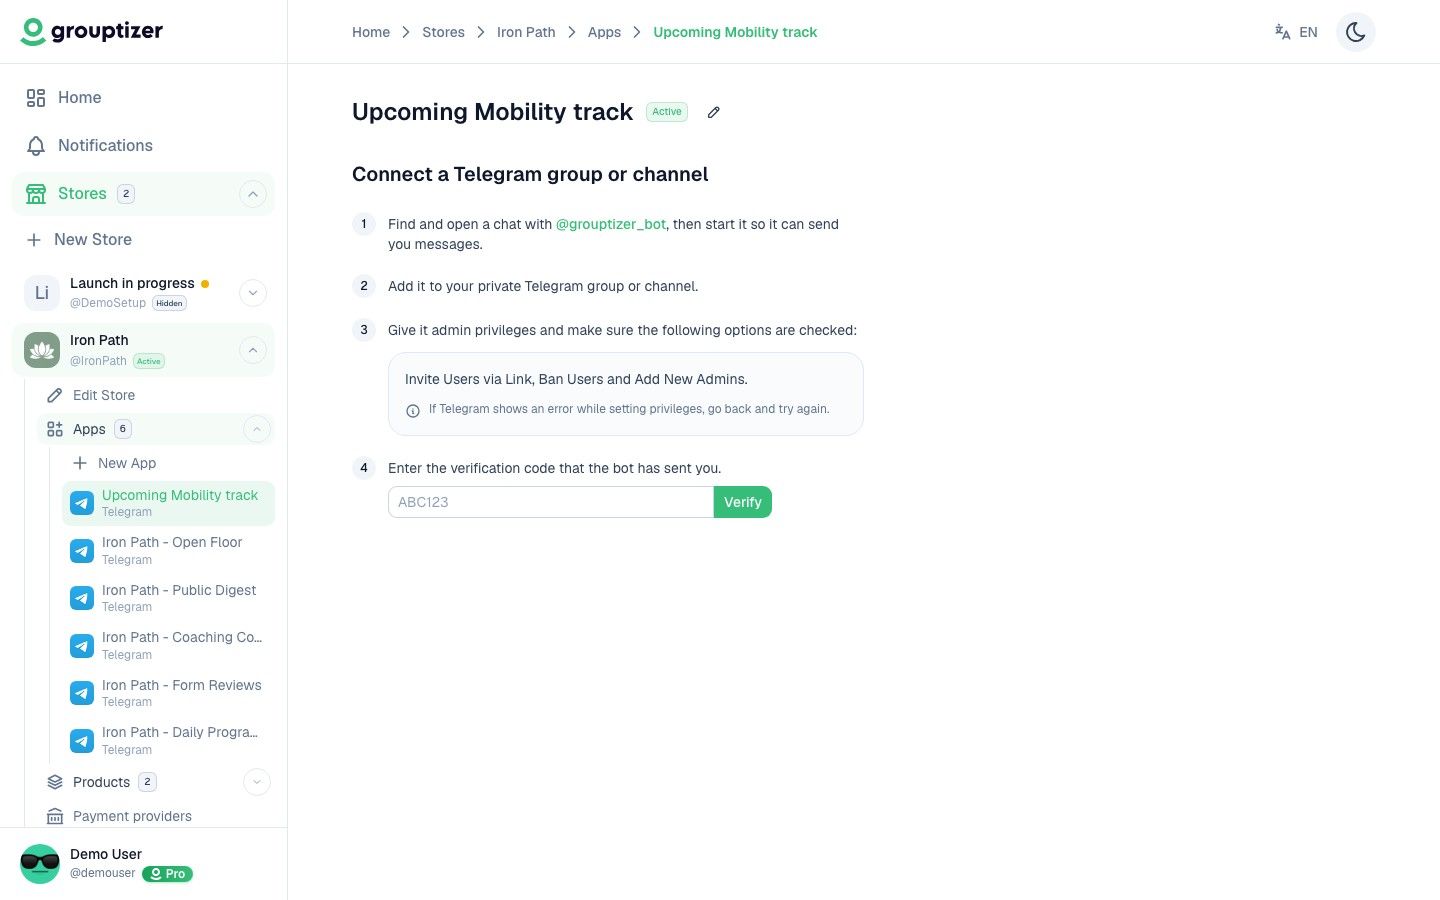
Once the code is correct, the integration moves to Verified and is ready to accept buyers. From that point on, the bot handles granting and revoking access on its own.
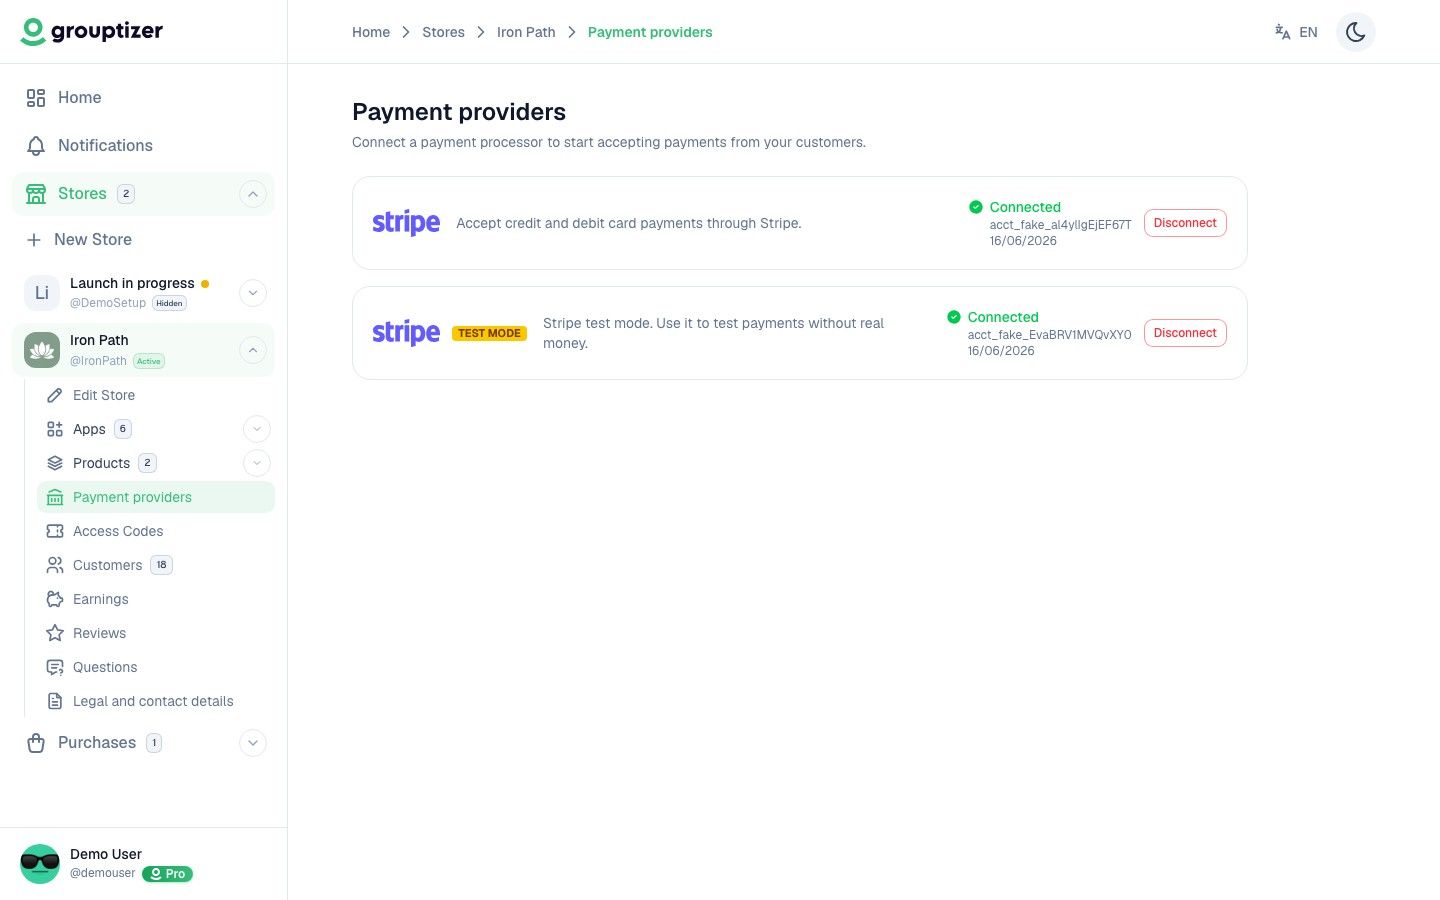
4. Connect your Stripe account
In your store, go to Payment providers and click Connect next to Stripe. Grouptizer uses Stripe to charge your buyers, and the money lands directly on your own account: Grouptizer never holds your funds.
If you don't have a Stripe account yet, you can create one during the connection flow. Stripe also separates live mode (real charges) from test mode, so you can try out checkout with test cards before you start selling.
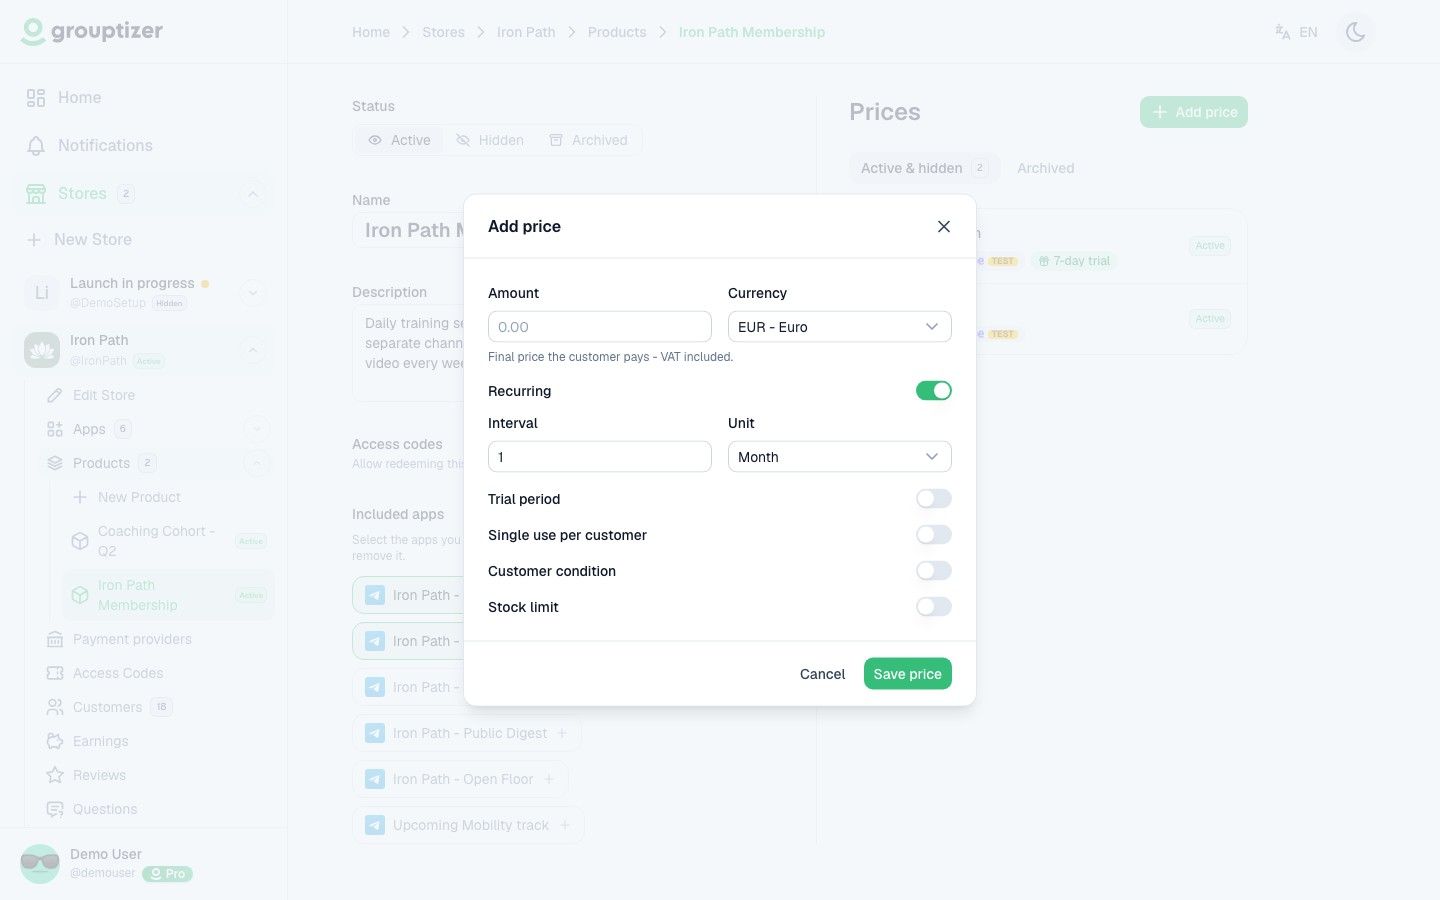
5. Create a product and set a price
A product is what your customers see and buy. Go to Products, click New product and give it a name. Then open it to add a description, choose which Telegram channels or groups it unlocks, and optionally allow access codes.
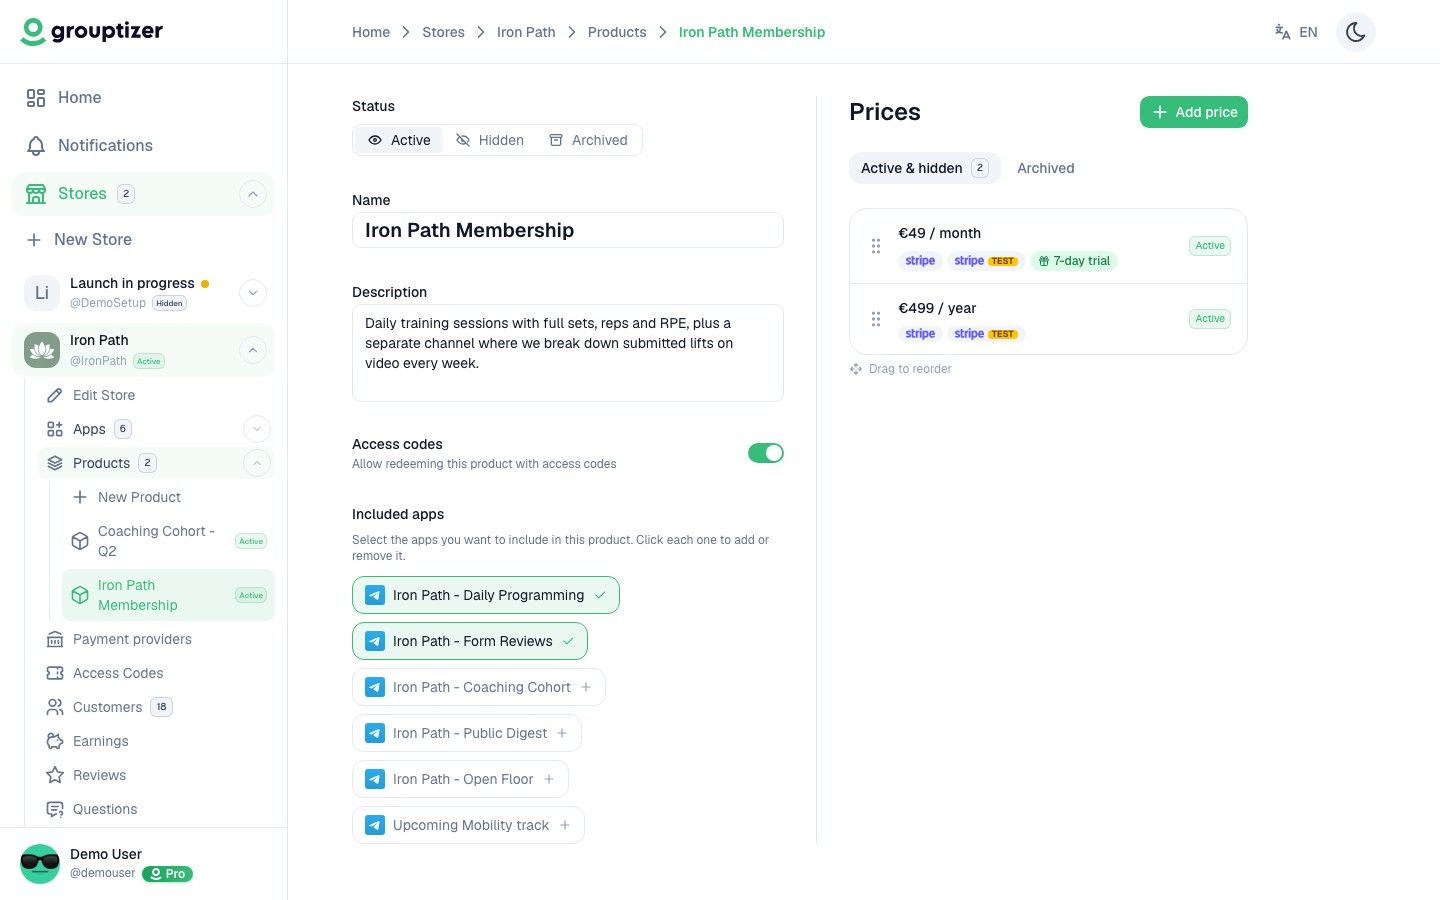
Next, add at least one price. You choose the amount and currency, and whether it's a recurring subscription (monthly, yearly, etc.) or a one-off payment. You can include a free trial. When you edit the price, you enable Stripe as the payment method: without it, the price can't be bought.
6. Publish your store and share the link
Once you have Telegram verified, Stripe connected, and a product with a price, you can publish. Go to Edit store, switch the status to Active, and your store goes public. Copy its URL (something like grouptizer.com/YourStore) and share it anywhere: your channel, your social media, your email signature, or your ads.
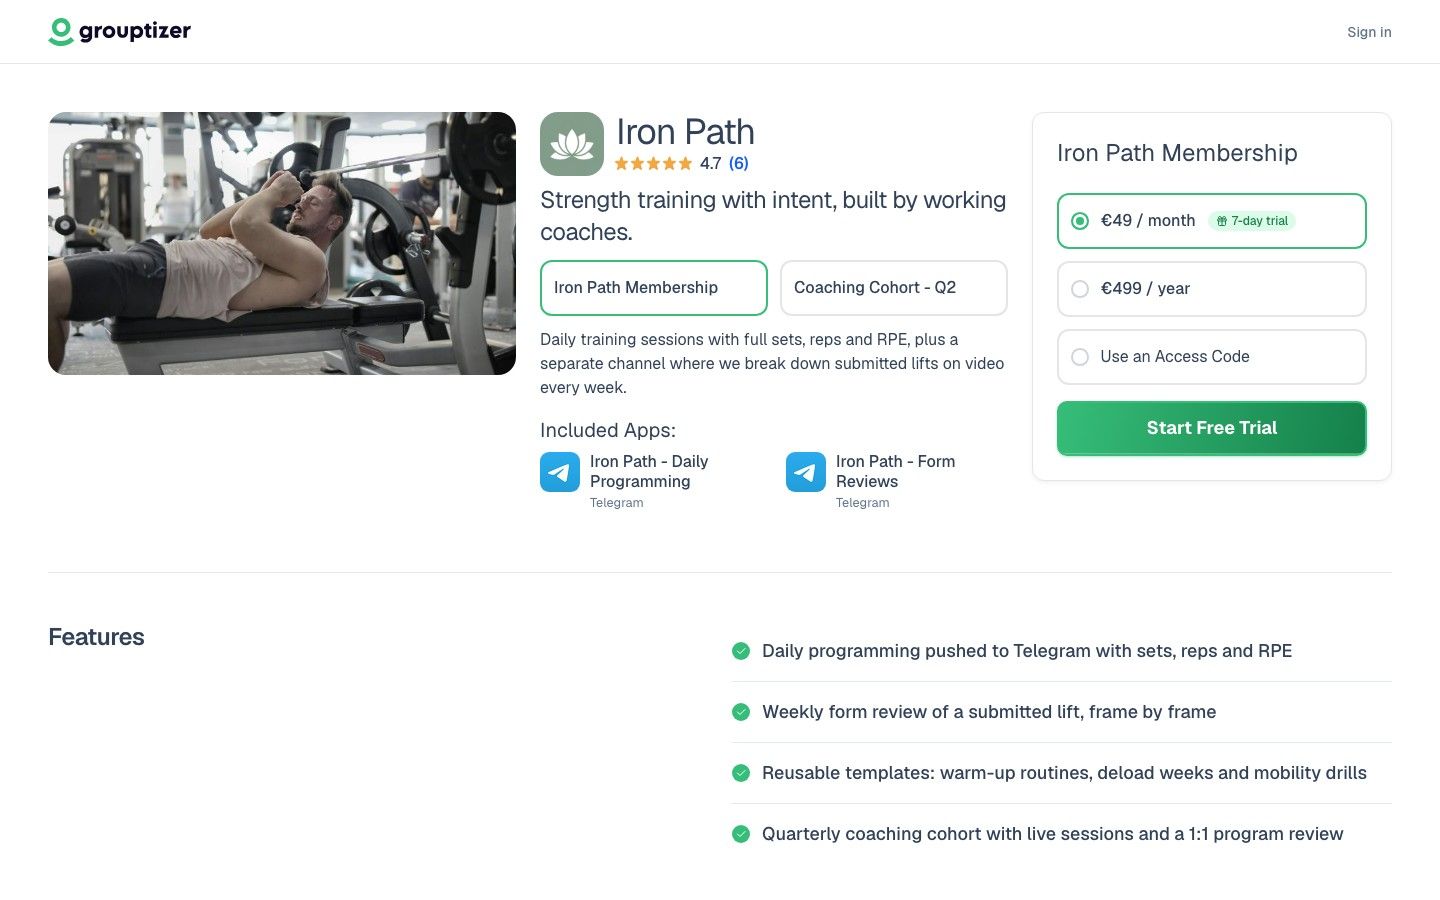
This storefront does the job that used to require your own website: through it your customers subscribe, check their subscription status, and cancel on their own. When someone buys, the bot grants them access to the channel automatically and removes them when their subscription ends, with nothing for you to do.
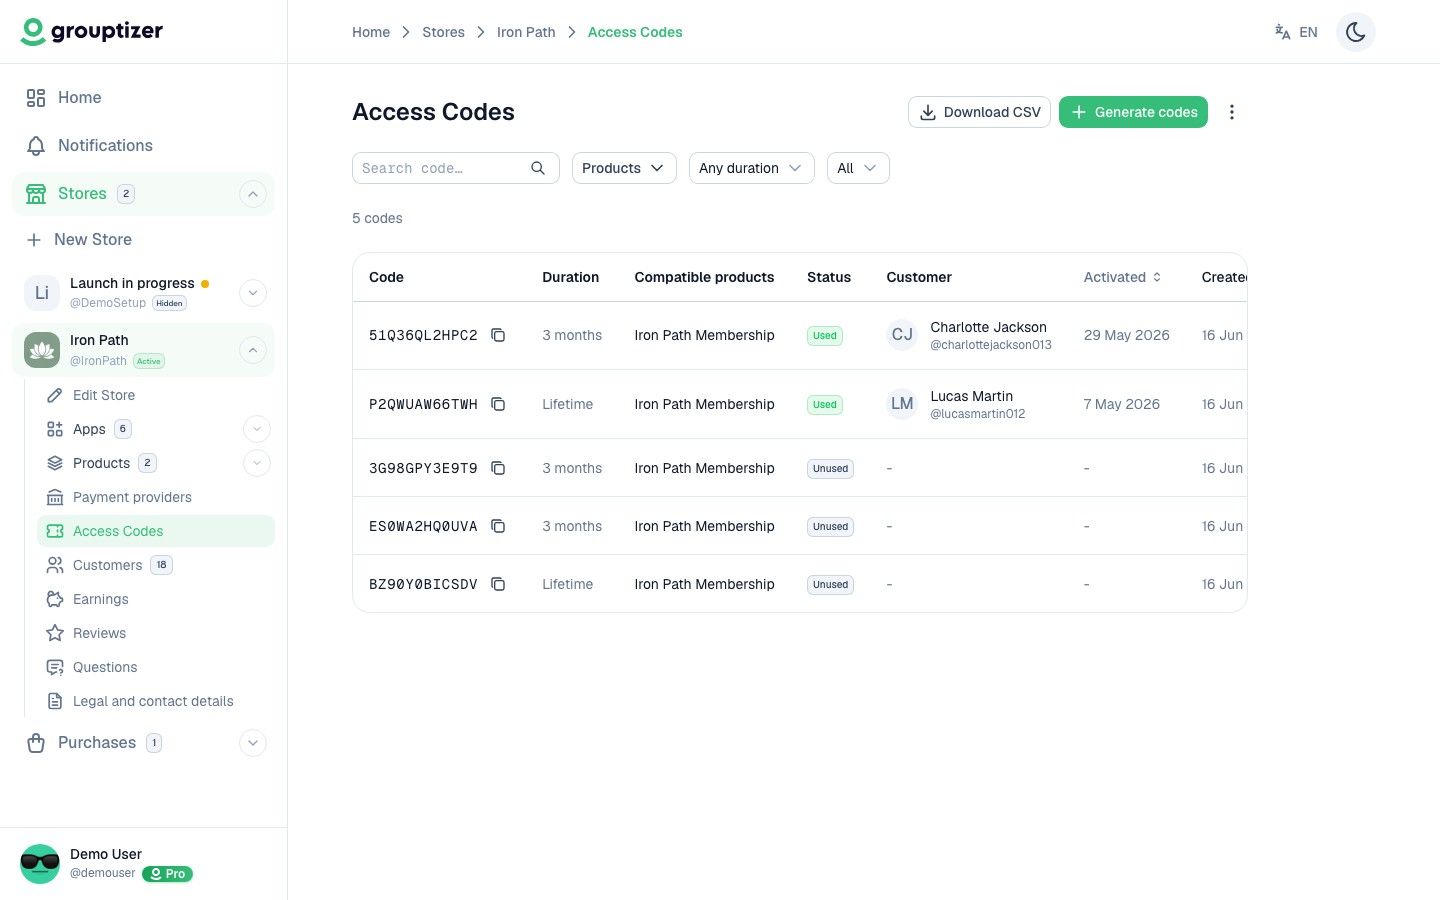
Create Access Codes for your users (optional)
If you'd rather not use Stripe (or you want to complement it) you can generate Access Codes to sell or give away access on your own.
They're alphanumeric codes that let your customers into your group or channel. You enable them per product, you can create them with different expiry dates, and they can be used alongside Stripe.
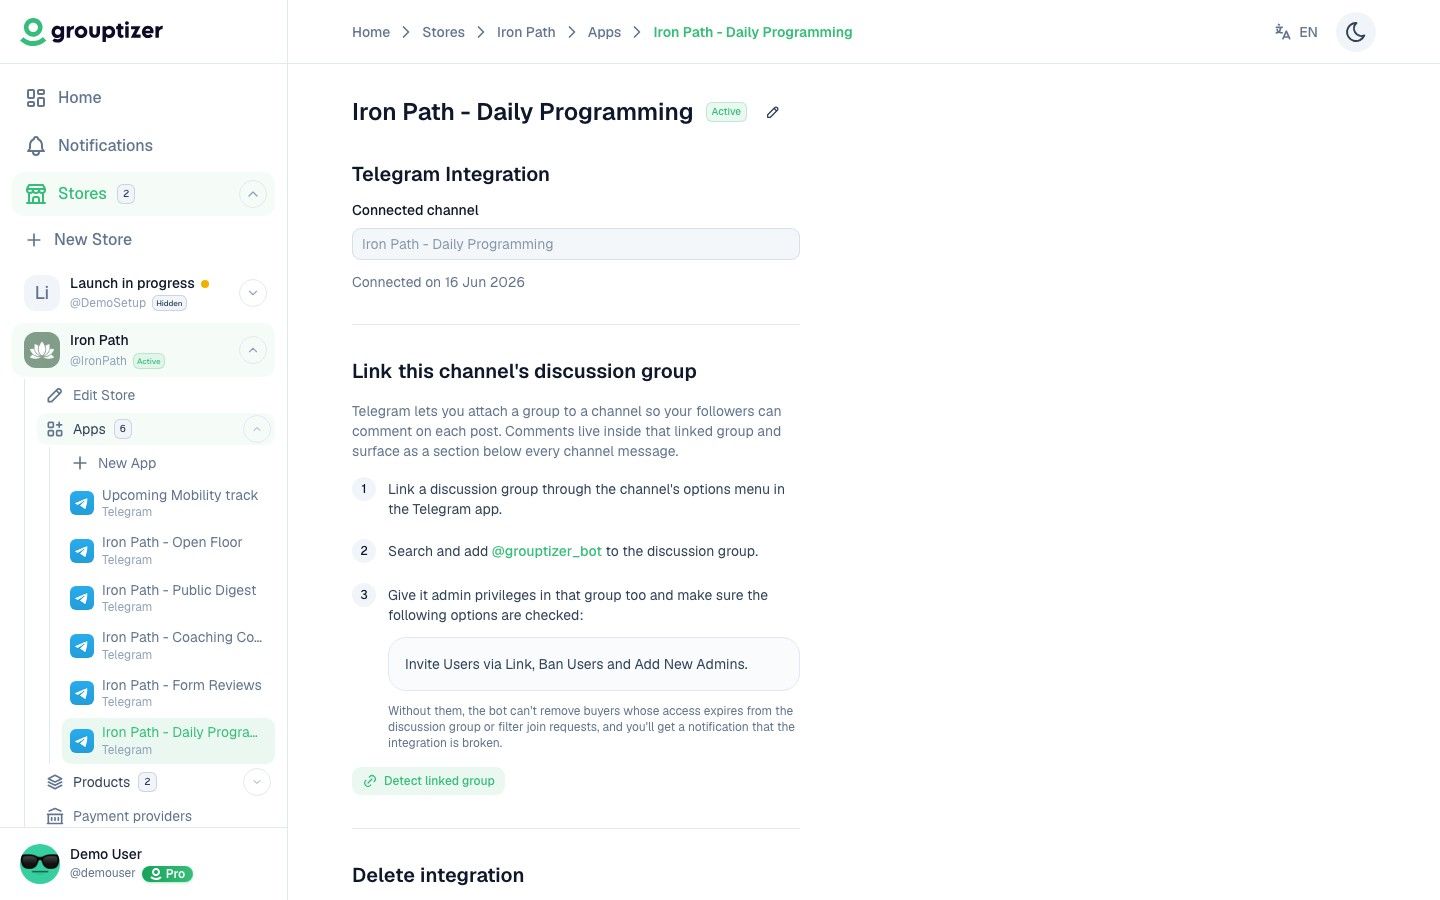
Link a discussion group to your channel (optional)
Telegram channels can be linked to a discussion group so your subscribers can leave comments on each post. Telegram supports this officially from within its own app.
If that's your case, link the discussion group in Telegram, add @grouptizer_bot as an administrator of that group, with the same three permissions as in the channel: Invite Users via Link, Ban Users, and Add New Admins. Then detect it from the Telegram app settings in Grouptizer.
Once linked, Grouptizer can remove users from the discussion group when their subscription expires or is cancelled.

What can you sell in a paid Telegram channel?
Any content with an audience willing to pay for depth works in this format. Among the creators using Grouptizer, the recurring cases are trading signals and market analysis channels, courses with a student community, analysis newsletters, and professional or niche communities.
If you're still weighing which model fits you, we go through all the alternatives with their numbers in how to monetize a Telegram channel.
Frequently asked questions
How much does it cost to create a paid Telegram channel?
Nothing upfront. With Grouptizer's Free Plan you only pay a 10% commission on what you charge through Stripe, and if sales go well you can move to a higher plan to reduce it.
Can I turn an existing channel into a paid one?
Yes. No need to start from scratch: make your current channel or group private, add @grouptizer_bot as an administrator, and new members will join through your store. Nothing happens to the people already inside.
How do members who stop paying get removed?
You don't have to do it. When a subscription expires or is cancelled, the bot removes that person from the channel automatically, and from the linked discussion group too if you have one set up.
Can I charge for access without using Stripe?
Yes, with Access Codes: alphanumeric codes you generate from your store to sell or give away access on your own. They can work alongside Stripe on the same product.
How much should I charge for my channel?
It depends on your niche and what you deliver. Most paid channels sit between 5 and 50 dollars a month. Starting at the low end and raising the price for new subscribers as you build results works best.
And that's it. Setting up a paid Telegram channel or group no longer means wrangling websites, developers or spreadsheets to track who's paid. Grouptizer takes care of the payments and the access; you take care of your community and your content.